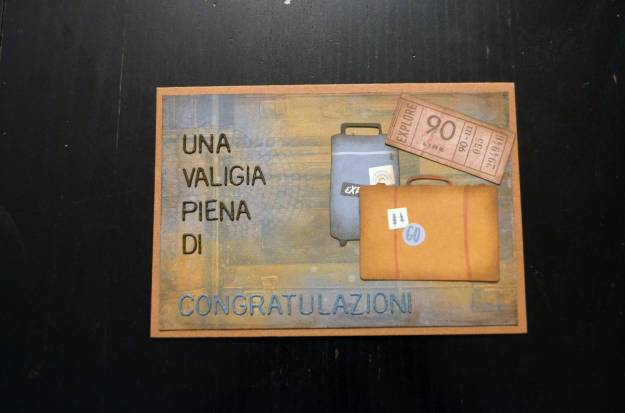
Mixed Media: ein weites Feld. Ich versuche mich seit Kurzem in dieser Richtung – und es macht irre Spaß. Allerdings gestalte ich keine Art Journals oder Ähnliches, sondern konzentriere mich auf Karten. Wie diese Geburtstagskarte, die bei mir in Auftrag gegeben wurde.
Mixed media: a broad field. Recently, I started to dabble in it – and it’s a lot of fun. I don’t do art journals or the like but concentrate on making cards. Like this birthday card that was commissioned.
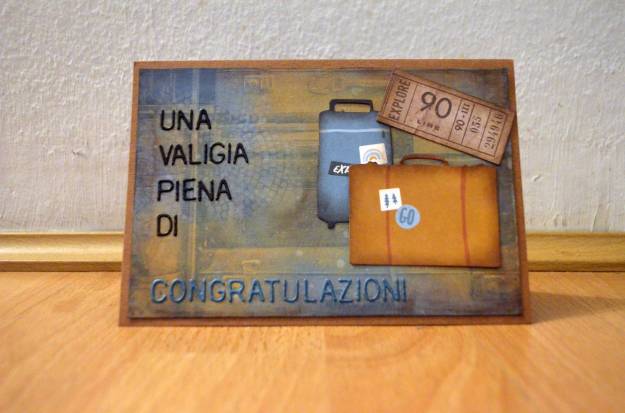
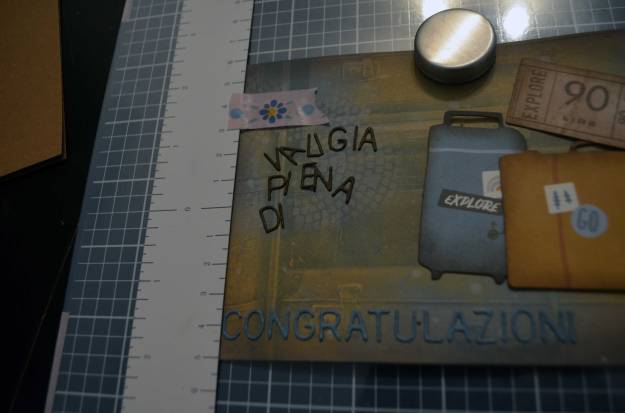
Irgendwas mit Reisen und Italien, lautete die Vorgabe. Daher die Koffer und der Spruch auf Italienisch (übersetzt lautet er „Ein Koffer voller Glückwünsche“).
My „customer“ asked for something that has to do with travelling and Italy – so I went for suitcases and a sentiment in Italian (translated, it means „A suitcase full of congratulations“).
How to
Zuerst habe ich ein Stück Designpapier und ein Stück weißen Cardstock so zurecht geschnitten, dass beides ein wenig kleiner ist als die Klappkarte, auf die es schlussendlich kommen sollte. Dazu habe ich drei Stanzteile (sie stammen aus einem sogenannten Epherema-Set; Epheremas sind Stanzteile aus Papier, die für Collagen o. Ä. verwendet werden) ausgewählt. Designpapier und Stanzteile passen wunderbar zusammen, weil sie aus einer gemeinsamen Linie stammen.
First, I cut a piece of patterned paper and a piece of white cardstock a little bit smaller than the note card, onto which both would be adhered. I chose three die-cuts (they are from a so-called epherema pack; epheremas are die-cuts from papier used for collages or similar projects). The die-cuts and the patterned paper go perfectly with each other because they are from the same line of design.
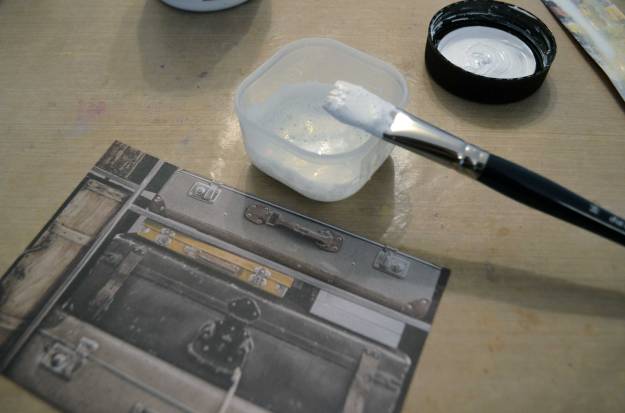
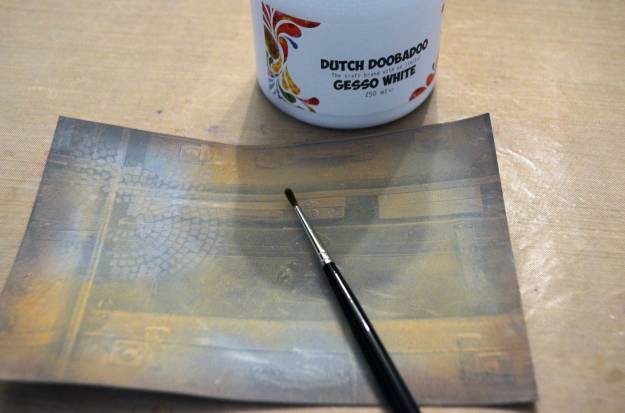
 Als nächstes habe ich ein wenig weißes Gesso mit etwas Wasser verdünnt und gleichmäßig auf das Designpapier aufgetragen, um eine leichte Grundierung zu erhalten und den lebhaften Hintergrund eine Spur zu beruhigen.
Next, I diluted white gesso with water and applied it to the patterned paper to prep it and to tone down the busy background.

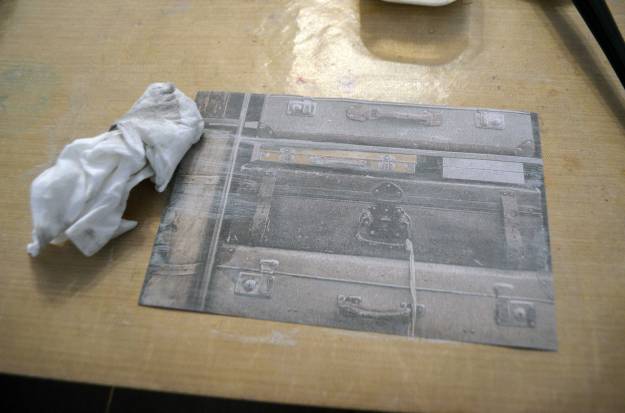
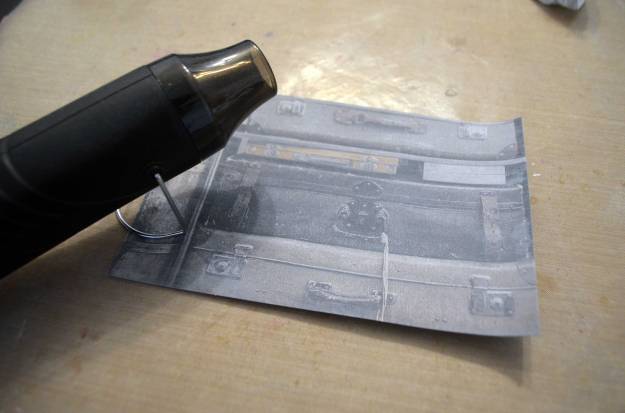
Mit einem halbtrockenen Feuchttuch habe ich überschüssiges Gesso weggewischt und per Heat Tool dafür gesorgt, dass die Sache knochentrocken ist.
I used a half-dried baby wipe to wipe away excess gesso and dried everything with a heat gun.
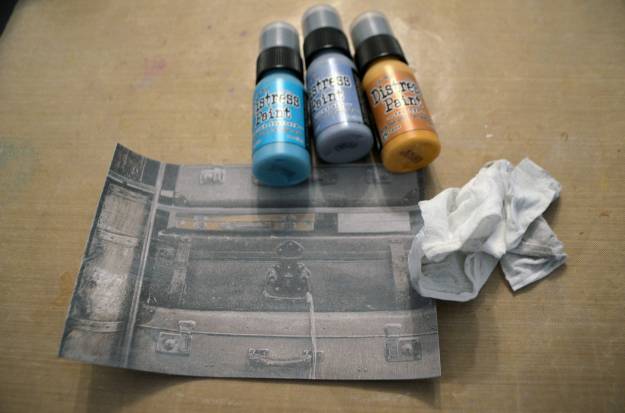
 Als nächstes habe ich zwei passende Distress Paint-Farbtöne aufgetragen (auf dem Foto sieht man drei, einen habe ich aber weggelassen), indem ich die Farbe direkt aufs Papier getupft und mit einem halbtrockenen Feuchttuch verwischt habe. Die Restfeuchtigkeit sorgt dafür, dass die Farben sich gut verteilen lassen und nahtlos ineinander übergehen, allerdings darf das Tuch nicht zu feucht sein, sonst verteilt man die Farbe nämlich nicht, sondern wischt sie komplett wieder weg.
Next, I applied two Distress Paints (I didn’t use the third one you see on the picture below) by dabbing some colour directly onto the paper and spread it with a half-dry baby wipe. The dampness allows the paints to spread and blend nicely, but be sure the baby wipe is not too wet – in this case, you won’t spread the colour but take it off completely.


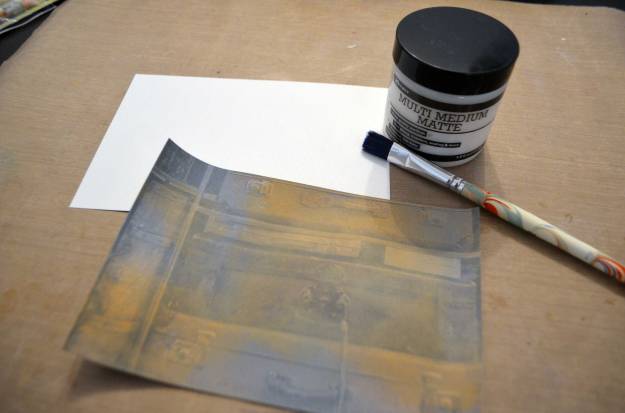
Nachdem die Farben getrocknet waren, habe ich das dünne Designpapier auf das Cardstockstück geklebt. Dafür habe ich Multi Medium Matte verwendet, das ich mit einem Pinsel aufgetragen habe. Es funktionieren aber auch andere Klebstoffe.
After the colours were dry, I adhered the light-weighed patterned paper onto the piece of cardstock. I used multi medium matte in order to do so. I applied it with a brush. You could use other adhesives as well.
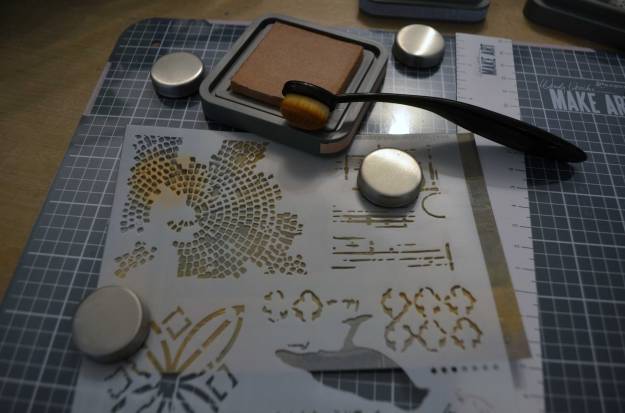
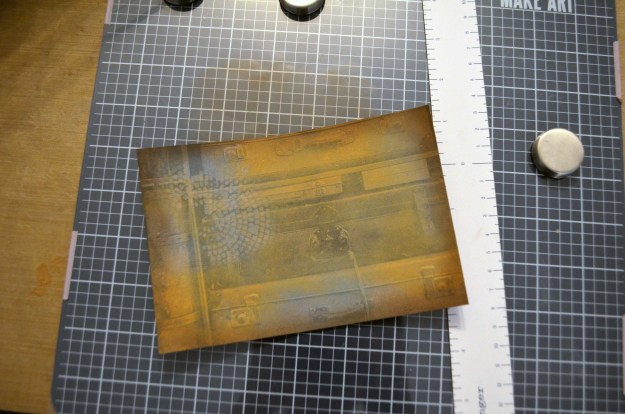
 Als nächstes habe ich mit einer Blending Brush einen passenden Distress Oxide-Farbton durch eine Schablone aufgetragen. Anschließend habe ich den Rand des Panels mit Distress Oxide Vintage Photo eingefärbt (ebenfalls per Blending Brush).
Next, I applied a matching Distress Oxide colour through a stencil and used another Distress Oxide colour (Vintage Photo) to darken the panel’s edges – I used a blending brush to do so.
Probeweise habe ich die Stanzteile aufgelegt und so lange herumgeschoben, bis mir die Anordnung gefallen hat. Dann habe ich die Ränder der Teile mit Distress Oxide Walnut Stain abgedunkelt; so passen sie besser zum Design.
I laid out the die-cuts and moved them around until I was happy with the arrangement. Next, I used Distress Oxide Walnut Stain to darken the edges of the die-cuts. This way, they don’t stand out but match the design of the panel.


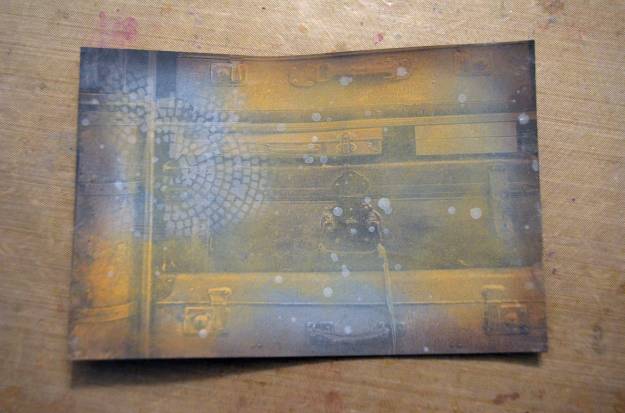
Mit einem feinen Pinsel habe ich einige Spritzer Gesso (verdünnt) auf dem Panel verteilt.
I used a fine paint brush to sprinkle some gesso (diluted) onto the panel.
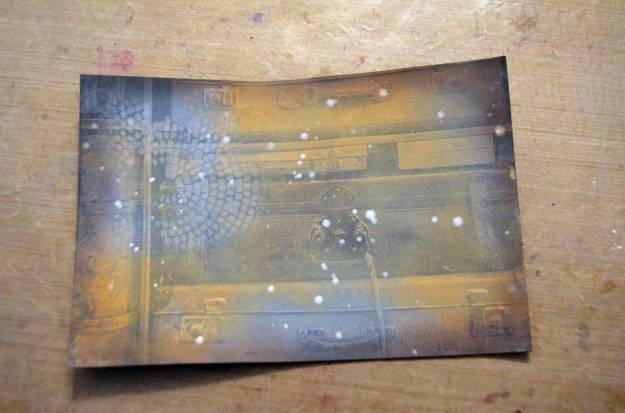
Die Tropfen sind nur in feuchtem Zustand blendend weiß; nach dem Trocknen sind sie semitransparent.
The droplets turn semi-transparent after they have dried.
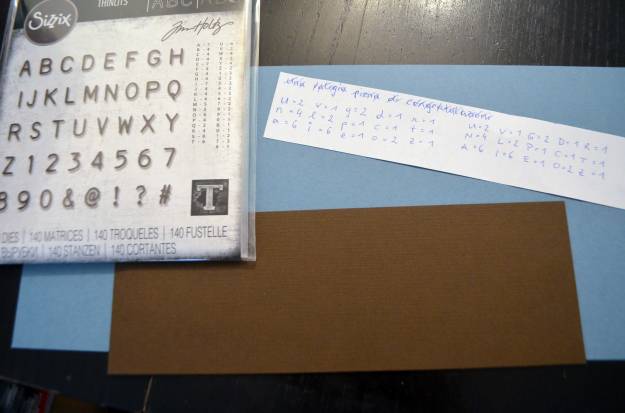
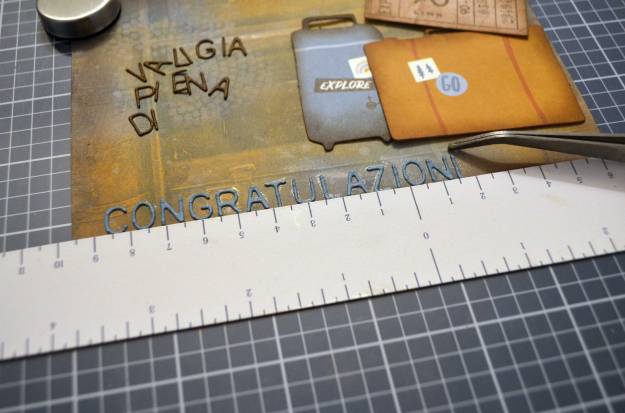
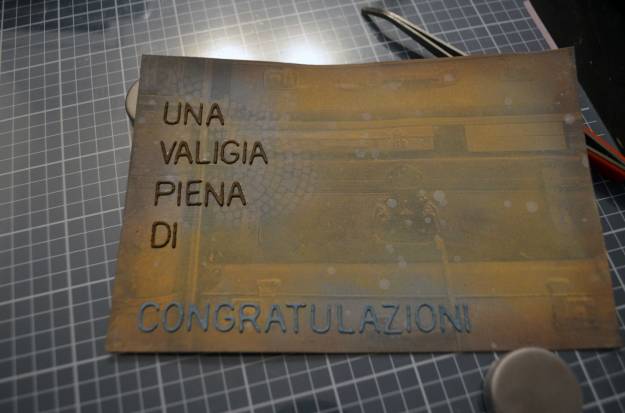
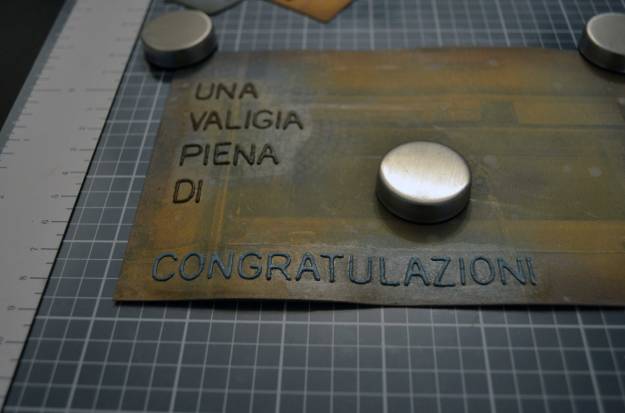
Den Spruch habe ich mit ausgestanzten Buchstaben geschrieben. Ich habe mir zuerst aufgeschrieben, welchen Buchstaben ich wie oft brauche, um nicht durcheinander zu kommen – die ersten vier Wörter habe ich aus braunem und das letzte Wort aus hellblauem Cardstock gestanzt.
I used die-cut letters to create the sentiment. To stay on top of things, I wrote down how many letters I would need. I die-cut the first four words from brown cardstock and the last word from light blue cardstock.
 Das magnetische Lineal, das bei der MAKE ART Stay-tion dabei ist, eignet sich super als Führungsschiene – dank ihm (und einem Pick-up Tool) konnte ich die Buchstaben gerade anordnen und aufkleben.
The MAKE ART Stay-tion comes with a magnetic ruler which is very useful. It can serve as a guide when it comes to glue down letters in a straight fashion (using a pick-up tool also helped).

Widerspenstige Buchstaben habe ich mit einer Pinzette gerade gerückt.
Tweezers helped to set straight stubborn letters.
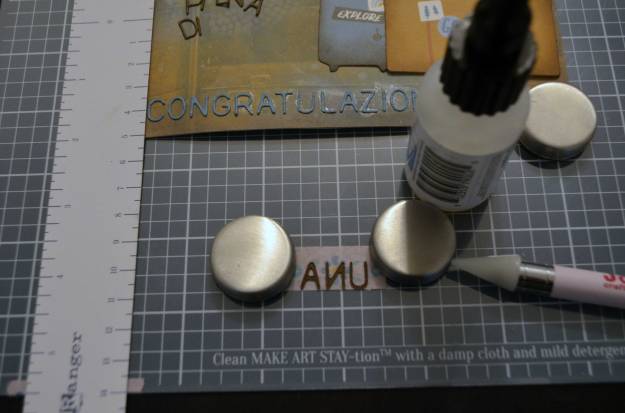
Die restlichen Wörter wollte ich linksbündig untereinander aufkleben. Das magnetische Lineal hat dafür gesorgt, dass die Linksbündigkeit kein Problem war, und um die Wörter zeitsparend und einfach anzubringen, habe ich sie (mit der richtigen Seite nach unten und rückwärts angeordnet) auf einem Stück Washi Tape angebracht, am Rücken mit Klebstoff versehen, das Ganze umgedreht und direkt aufs Panel geklebt. Sobald der Klebstoff getrocknet ist, lässt sich das Washi Tape problemlos abziehen – und das Wort ist, wo es hingehört.
I wanted to align the rest of the words on the left side. The magnetic ruler helped with the alignment, and for the words I used a little trick: I adhered the letters face-down and in reverse order onto a piece of washi tape, applied glue on their back, picked up the washi tape, flipped it over and pressed it down on the right spot of the panel. Once the glue was dry, I could remove the washi tape without any problems – and the word stuck exactly where it belonged.


Damit die zierlichen Buchstaben wirklich bombenfest an Ort und Stelle bleiben, habe ich eine Schichte Multi Medium Matte mit einem Pinsel darüber aufgetragen.
To make sure the delicate letters stay in place no matter what, I applied a layer of multi medium matte with a paint brush.

Als nächstes habe ich die Stanzteile, die ich bisher nur lose aufgelegt hatte, mit Flüssigkleber angebracht. Zum Trocknen habe ich sie auf der MAKE ART Stay-tion mit Magneten fixiert.
Next, I glued down the die-cuts. I used liquid adhesive and fixed the die-cuts with magnets on the MAKE ART Stay-tion during the drying time.

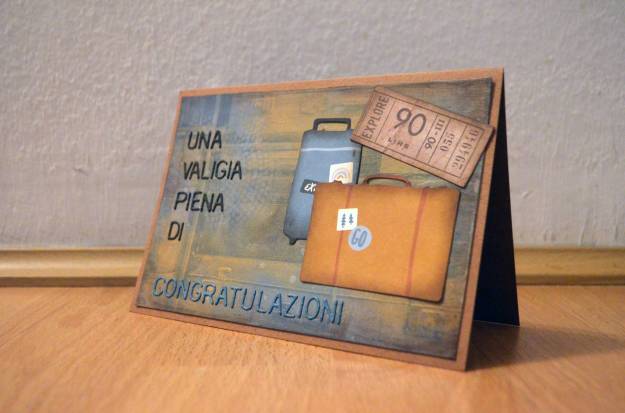
Mit Flüssigkleber habe ich dann das fertige Panel auf die Klappkarte geklebt.
I used liquid adhesive to adhere the finished panel onto the note card.


Benutzte Materialien / Supplies I used
Papier / Paper
- Cardstock in Weiß / cardstock in white
- Designpapier „Let’s Go – Carry On“ (Kaiserkraft) / patterned paper „Let’s Go – Carry On“ (Kaiserkraft) [Wird leider nicht mehr hergestellt, daher diesmal kein Link.] / [Sadly retired, so no link this time.]
- Klappkarte in Kraftbraun, 5″ x 7″ / pre-fold card in kraft brown, 5″ x 7″
Stanzen / Dies
- Thinlits Die Set Alphanumeric Label (Sizzix)
Stempelfarben / Inks
- Distress Oxide (Ranger)
Schablonen / Stencils
- Raven’s Mosaic (TCW The Crafters Workshop) [Wird leider nicht mehr hergestellt, daher dieses Mal kein Link.] / [Sadly retired so no link this time.]
Werkzeug & Klebstoffe / Tools & Adhesives
- Big Shot + Platten + magnetische Platte / Big Shot + cutting pads + magentic platform
- Craft Sheet (Ranger)
- Feuchttücher / baby wipes
- Heat Tool (WOW!)
- Make-up-Bürsten (EMax Design) / make-up brushes (EMax Design)
- Multi-Medium Matte (Ranger)
- Nuvo Deluxe Adhesive (Tonic Studios)
- On Point Glue (Imagine Crafts/Tsukineko)
- Paper Trimmer 12,25″/31 cm Maxi Guillotine 1980ePaper Trimmer 12,25″/31 cm Maxi Guillotine 1980e (Tonic Studios)
- Pinsel / paintbrush
- Pinzette / tweezers
- Sticky Picktool (Joy!Crafts)
- Washi Tape zum Befestigen / washi tape to secure
- Wendy Vecchi MAKE ART Stay-tion (Ranger)
Embellishments
- Ephemeras Collectables Die Cuts „Let’s go“ (Kaiserkraft) [Wird leider nicht mehr hergestellt, daher diesmal kein Link.] / [Sadly retired, so no link this time.]
Farben / Paints & Pens
- Gesso White (Dutch Doobadoo)
- Tim Holtz Distress Paint (Ranger)
